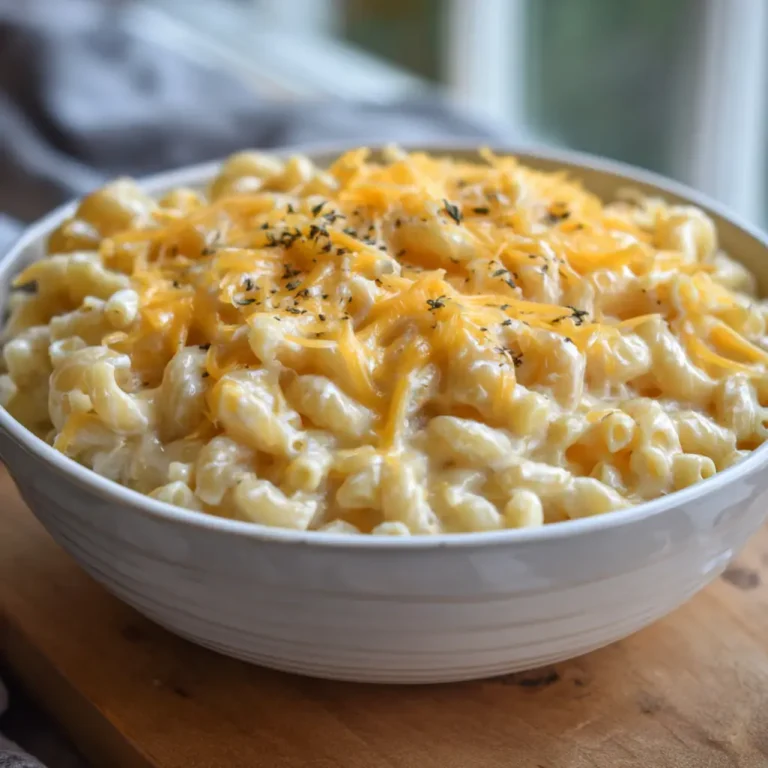
Baked Mac and Cheese Recipe: The Ultimate Comfort Dish
There’s something about baked macaroni and cheese that hits the spot every single time. This dish has a way of bringing everyone together, whether it’s served at a family dinner, holiday gathering, or casual weeknight meal. The creamy, cheesy goodness that fills your mouth is undeniably comforting and satisfying. When made right, the baked mac and cheese recipe is rich, flavorful, and perfectly golden on top.

What makes baked mac and cheese stand out from the stovetop version is the crispy, cheesy crust that forms while baking. It’s a delightful contrast to the smooth, velvety texture of the sauce. Whether you’re a novice cook or an experienced chef, this step-by-step guide will show you how to create the perfect baked mac and cheese that will surely become a family favorite.
Ingredients Needed
Here’s a list of everything you’ll need to make this delicious baked mac and cheese. We’ve also included the calorie count for each ingredient so you can keep track of your intake if you’re counting calories.
| Ingredient | Amount | Calories per Serving |
|---|---|---|
| Elbow macaroni | 8 oz | 200 |
| Unsalted butter | 4 tbsp | 400 |
| All-purpose flour | 1/4 cup | 100 |
| Whole milk | 2 cups | 300 |
| Heavy cream | 1/2 cup | 200 |
| Cheddar cheese (shredded) | 2 cups | 800 |
| Mozzarella cheese (shredded) | 1 cup | 300 |
| Parmesan cheese (grated) | 1/2 cup | 200 |
| Salt | 1 tsp | 0 |
| Black pepper | 1/2 tsp | 0 |
| Garlic powder | 1/2 tsp | 0 |
| Mustard powder | 1/2 tsp | 0 |
| Paprika | 1/4 tsp | 0 |
| Breadcrumbs (optional) | 1/2 cup | 100 |
Total Calories per Serving: ~400-500 (depending on portion size and optional toppings)
Now that we have our ingredients lined up, it’s time to get cooking!
Step-by-Step Cooking Instructions
Step 1: Boil the Pasta
Start by bringing a large pot of salted water to a boil. Once boiling, add the elbow macaroni and cook according to the package instructions, usually about 8-10 minutes. The goal is to cook the pasta al dente, so it doesn’t get mushy when baked later. Once done, drain the pasta and set it aside.
Step 2: Prepare the Cheese Sauce
While the pasta is cooking, it’s time to prepare the creamy cheese sauce. Begin by melting the butter in a large saucepan over medium heat. Once melted, whisk in the flour to form a smooth paste. This will help thicken the sauce as it cooks.

Continue to cook the butter and flour mixture (called a roux) for about 2 minutes, stirring constantly. This will remove the raw flour taste. Slowly pour in the milk and heavy cream, whisking continuously to avoid lumps.
Once the mixture begins to thicken, stir in the shredded cheddar, mozzarella, and grated Parmesan cheeses. Keep stirring until all the cheese has melted into the sauce. Season the sauce with salt, black pepper, garlic powder, mustard powder, and paprika. Taste the sauce and adjust the seasoning if needed. The sauce should be thick and creamy.
Step 3: Combine Pasta and Cheese Sauce
Add the drained pasta to the cheese sauce, stirring to ensure all the noodles are fully coated. If the sauce seems too thick, add a little more milk or cream to achieve your desired consistency. Once the pasta is well-coated, transfer the mixture into a greased 9×13 baking dish.
Step 4: Add Topping (Optional)
If you’re using breadcrumbs for added texture, sprinkle them evenly over the top of the macaroni and cheese. You can also sprinkle a little extra grated Parmesan for a cheesy crust. The breadcrumbs add a delightful crunch and contrast to the creamy interior.
Step 5: Bake the Mac and Cheese
Preheat your oven to 350°F (175°C). Bake the macaroni and cheese for 20-25 minutes or until the top is golden brown and bubbly. If you like a crispier top, you can broil it for the last 2-3 minutes of baking, but be sure to keep a close eye on it to prevent burning.
Step 6: Let it Rest
Once out of the oven, let your baked mac and cheese rest for about 5 minutes. This allows the sauce to set and makes it easier to slice and serve.
Tips for Customizing the Recipe
One of the best things about baked mac and cheese is that you can easily customize it to fit your tastes. Here are some ways to make this dish your own:
- Cheese Varieties: While cheddar is classic, feel free to mix in other cheeses like Gouda, Gruyere, or Monterey Jack for a unique flavor profile.
- Add Protein: Want to make it heartier? Add cooked bacon, sausage, or even shredded chicken to the dish before baking. This turns your mac and cheese into a one-pan meal.
- Spices and Seasonings: Try adding a pinch of cayenne pepper for some heat or a dash of nutmeg for warmth. A few dashes of hot sauce also work well for a spicy kick.
- Vegetable Add-ins: If you’re looking to sneak some veggies into the dish, consider adding steamed broccoli, sautéed spinach, or roasted tomatoes. These can be mixed in with the pasta before baking.
- Vegan or Dairy-Free Option: For a dairy-free mac and cheese, swap out the milk, cream, and cheeses for plant-based alternatives like almond milk, coconut cream, and vegan cheese.
Nutritional Information
Here’s an approximate breakdown of the nutritional content for a standard serving of baked mac and cheese:

These values are based on a standard serving of baked mac and cheese and may vary depending on the specific ingredients and portion sizes used.
Serving Suggestions
Baked mac and cheese is a versatile dish that pairs well with a variety of sides and mains. Here are some ideas to complete your meal:
- Green Salad: A simple salad with fresh greens and a light vinaigrette will balance out the richness of the mac and cheese.
- Roasted Vegetables: Carrots, broccoli, or Brussels sprouts roasted with olive oil, salt, and pepper make a great complement.
- Grilled Meat: Serve your mac and cheese alongside grilled chicken, steak, or even pork chops for a hearty meal.
- Bread: Fresh garlic bread or a warm, soft dinner roll pairs perfectly with the creamy mac and cheese.

Baked Mac and Cheese Recipe: The Ultimate Comfort Dish
Course: Blog4-6
servings20
minutes30
minutes400-450
kcalIngredients
8 oz elbow macaroni
4 tbsp unsalted butter
1/4 cup all-purpose flour
2 cups whole milk
1/2 cup heavy cream
2 cups shredded cheddar cheese
1 cup shredded mozzarella cheese
1/2 cup grated Parmesan cheese
1 tsp salt
1/2 tsp black pepper
1/2 tsp garlic powder
1/2 tsp mustard powder
1/4 tsp paprika
1/2 cup breadcrumbs (optional, for topping)
Directions
- Preheat Oven: Preheat the oven to 350°F (175°C). Grease a 9×13-inch baking dish with butter or cooking spray.
- Cook Pasta: Bring a large pot of salted water to a boil. Add the elbow macaroni and cook according to package instructions (8-10 minutes) until al dente. Drain and set aside.
- Make Cheese Sauce: In a large saucepan, melt butter over medium heat. Whisk in flour to form a smooth paste (roux), and cook for 2 minutes, stirring constantly. Slowly add the milk and cream, whisking until smooth and the mixture thickens.
- Add Cheese: Stir in the shredded cheddar, mozzarella, and grated Parmesan cheeses until fully melted. Add salt, black pepper, garlic powder, mustard powder, and paprika. Taste and adjust seasoning as needed.
- Combine Pasta and Sauce: Add the cooked macaroni to the cheese sauce and stir to coat the pasta evenly. If the sauce is too thick, add a bit more milk to reach your desired consistency.
- Transfer to Baking Dish: Pour the pasta and cheese mixture into the prepared baking dish.
- Add Topping (Optional): If using, sprinkle breadcrumbs evenly over the top for a crispy crust. You can also add a little extra Parmesan cheese for more flavor.
- Bake: Bake in the preheated oven for 20-25 minutes or until the top is golden and bubbly. For an extra crispy top, broil for the last 2-3 minutes (watch closely to avoid burning).
- Let it Rest: Remove from the oven and let the mac and cheese rest for 5 minutes before serving. This allows the sauce to set and makes it easier to slice.
Recipe Video
Notes
- Make-Ahead: You can prepare the mac and cheese up to the point of baking. Simply cover it and refrigerate for up to 2 days. When ready to bake, preheat the oven and bake as directed, adding a few extra minutes to account for the chill.
Freezing: Allow the mac and cheese to cool completely before freezing. Cover tightly with plastic wrap and foil. Freeze for up to 3 months. To reheat, bake at 350°F for 40-50 minutes from frozen or until heated through.
FAQs
1. Can I make baked mac and cheese ahead of time?
Yes! You can prepare the dish up to the point of baking, cover it, and store it in the fridge for up to 2 days. When ready to bake, simply preheat the oven and bake as directed, adding a few extra minutes to account for the chill.
2. Can I freeze baked mac and cheese?
Absolutely. Let the mac and cheese cool completely, then cover it tightly and freeze for up to 3 months. To reheat, bake from frozen at 350°F for 40-50 minutes or until heated through.
3. How do I make my baked mac and cheese extra creamy?
To get a creamier mac and cheese, make sure to use whole milk and heavy cream. You can also increase the amount of cheese for a richer sauce. Adding a small amount of cream cheese will also help achieve that creamy texture.
4. Can I use gluten-free pasta?
Yes, you can substitute the regular elbow macaroni with gluten-free pasta. The recipe will still turn out delicious!
5. How can I make the mac and cheese spicier?
Add some cayenne pepper, hot sauce, or even chopped jalapeños to the cheese sauce to give it a spicy kick.
Conclusion
Baked mac and cheese is one of those timeless dishes that never goes out of style. Whether you’re making it for a special occasion or just a comforting weeknight meal, this recipe delivers every time. With its creamy cheese sauce, tender pasta, and golden, crispy top, it’s sure to please even the pickiest eaters. Plus, it’s highly customizable, so you can tailor it to your taste with a variety of cheeses, spices, and add-ins.